Unstructured Data Discovery
Unstructured Data Discovery is a Data Focus module for automatically detecting, classifying, and reporting personal and sensitive data (PII) found in unstructured data across corporate file systems and cloud storage.
Note
This module is reached via the Unstructured Data group in the sidebar, which contains the Analytics, Discoveries, Finding Search, and False Positives screens described throughout this guide. Adding file targets and starting or scheduling scans is done from the Data Sources menu instead — see Adding a File Target and Starting a Scan.
Overview
Unstructured Data Discovery connects directly to file systems or cloud storage areas. Data Focus uses an agentless architecture, so no software needs to be installed on the servers being scanned.
Supported Data Sources and File Formats
Data Sources
Unstructured Data Discovery can connect to and scan the following data sources:
| Data Source | Use Case |
|---|---|
| SMB/CIFS | Windows file shares |
| Amazon S3 | AWS S3, MinIO, and S3-compatible storage |
| Azure Blob Storage | Azure Blob containers |
| ADLS Gen2 | Azure Data Lake storage |
| Google Cloud Storage | Google Cloud storage |
| Google Drive | Google Drive file sharing |
| SharePoint | SharePoint document libraries |
| Dropbox | Dropbox workspaces |
| Box | Box enterprise storage |
| Gmail | Gmail mailboxes and attachments |
| SFTP | Remote server file access via SFTP |
File Formats
A wide range of file formats is supported. The main categories are:
| Category | Formats |
|---|---|
| Text | TXT, LOG, MD, RST, CSV, TSV |
| Office | DOCX, XLSX, PPTX, ODT, ODS, ODP |
| PDF (text and OCR) | |
| Web / Structured | HTML, XML, JSON, YAML |
| Image | JPEG, PNG, TIFF, BMP (via OCR) |
| EML, MSG | |
| Archive | ZIP, TAR, GZ, 7Z |
| Legacy Office | DOC, XLS, PPT |
| Other | 1000+ formats (via automatic content-extraction engine) |
Adding a File Target and Starting a Scan
A file target is added from the Data Sources menu in the sidebar: click + New Data Source, select the Unstructured data source type, then choose one of the supported connector types (SMB, S3, Azure Blob, ADLS Gen2, GCS, Google Drive, SharePoint, Dropbox, Box, Gmail, or SFTP) and fill in the target form.
Once a target exists, a scan is started from the Data Sources > File Targets tab: clicking the New scan icon on the target's row opens the Data Sources > File Targets > New scan page, where the scan's scope and behavior can be configured in detail. The same File Targets tab also provides Edit (editing the target), Delete, and Test connection actions for each target.
When creating a new scan, its scope and behavior can be configured in detail. Users can define:
- File types to include
- File types to exclude
- Minimum and maximum file sizes
- Max Depth — the maximum folder depth
The Max Depth setting controls how many levels deep the scan descends into the folder structure, keeping scan scope under control in very deep folder hierarchies.
Scan Mode
Two scan modes are available when creating a scan:
- Single Scan: A scan is started against a single target.
- Multi-Server Bulk Scan: Multiple targets are scanned at the same time.
A blackout time (a period during which scanning should not run) can also be defined. During the specified day/time range, the scan pauses, pending jobs are parked, and once the window ends the scan automatically resumes where it left off — protecting system resources during business hours.
Scan Options
The scan creation screen includes the following options:
| Option | Description |
|---|---|
| Mask PII Values | Detected sensitive data is stored in masked form |
| Exclude False Positives | Findings previously marked as false positive are excluded |
| Scan hidden files | Hidden files are included in the scan |
| Include extensions only | Only the specified extensions are scanned (type an extension and press Enter, e.g. .pdf) |
| Exclude extensions | The specified extensions are excluded from the scan (e.g. .pdf) |
| Minimum file size | Minimum file size to scan (MB) |
| Maximum file size | Maximum file size to scan (MB) |
| Sampling | Enables sampling rules |
| Enable OCR | Enables OCR analysis for scanned PDFs and image files |
OCR Support
OCR can be enabled to analyze text inside scanned PDFs or image files. The OCR engine supports Turkish characters, and OCR is triggered automatically for PDF files that contain no extractable text. Two OCR engines are available: a fast default engine, and a vision-language-model-based engine that provides higher accuracy on complex page layouts. A confidence score is recorded for every OCR result.
Sampling
Sampling can be used to speed up scanning of large data areas. One Sampling method is selected for the scan:
| Method | Description |
|---|---|
| None | No sampling; every file is scanned. |
| Percentage | Scans a defined percentage of files (e.g. 10%). |
| Limit | Scans at most a defined number of files (e.g. 1000 files). |
| Stratified | Takes a defined number of samples per file type. |
Only one sampling method can be selected per scan.
Scan Management
Scan Lifecycle
A scan progresses through the following states:
PENDING → QUEUED → RUNNING → COMPLETED / FAILED / CANCELED / STOPPED
A running scan can be stopped, resumed, or canceled at any time.
Scan List
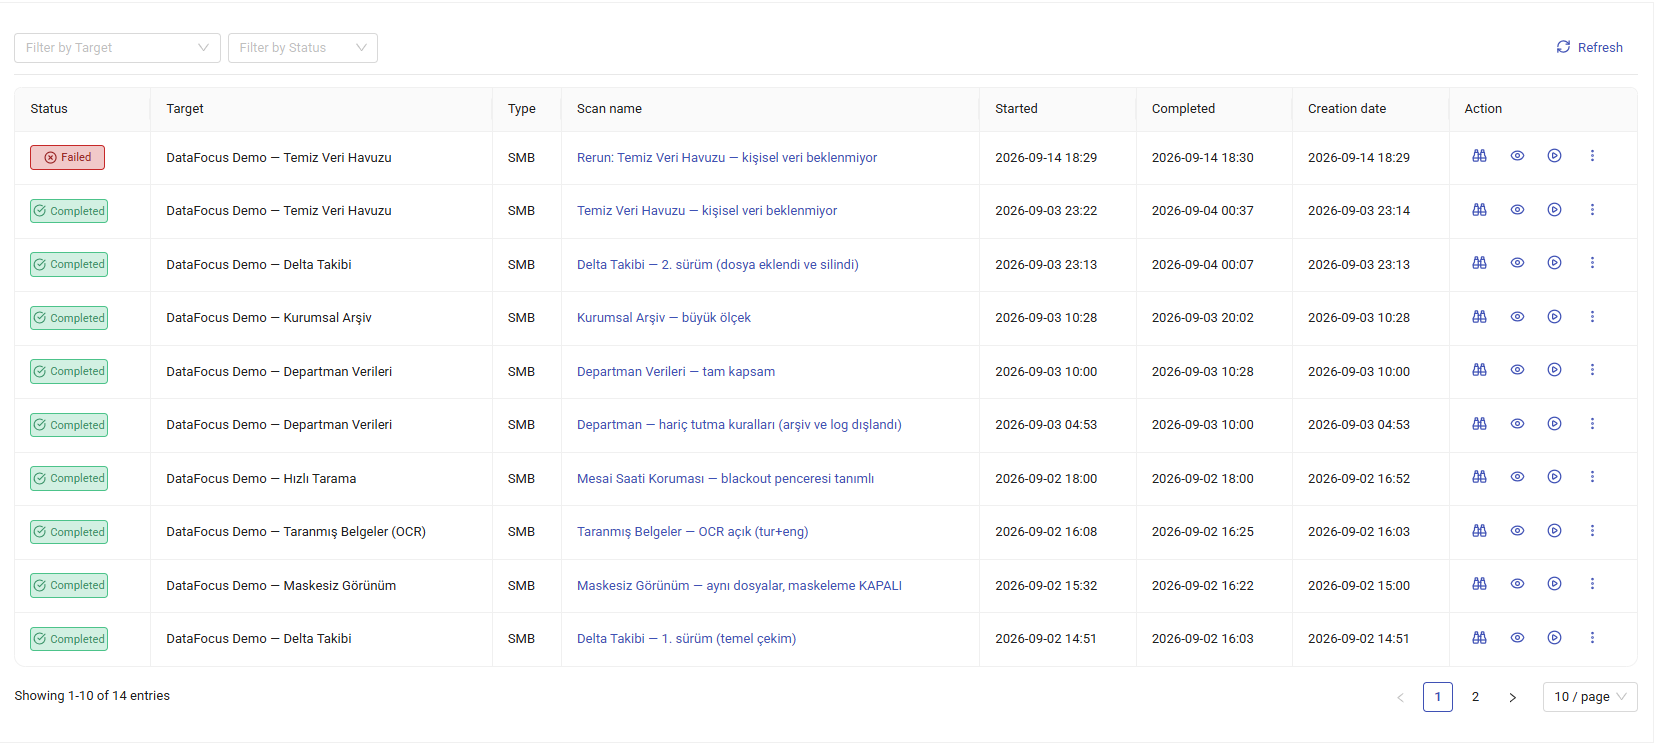
All scans that have been run are listed on the Discoveries screen (Unstructured Data > Discoveries); Monitor, Findings, and Report can be accessed for each scan, and a scan's version history can be viewed on a timeline (Version Timeline).
Adding or editing a file target, and scheduling scans, are done from the Data Sources menu — see Adding a File Target and Starting a Scan and Scheduled Scans.
Scan Actions
Each row in the scan list has an Actions column with operations for that scan. In addition to the buttons shown directly, more actions are available under the ⋮ (more) menu.
Direct buttons:
| Action | Description |
|---|---|
| Monitor | Opens the scan's live progress screen. From here the scan can be stopped (Stop) or resumed (Resume). |
| Findings | Opens the list of findings detected for that scan. |
| Cancel | Only shown while the scan is Running. Clicking it cancels the scan immediately with no confirmation; findings processed up to that point are kept, but the remaining work is lost. |
| Re-run | Shown for every status except Running (Completed, Failed, Pending, Cancelled, Stopped). Clicking it restarts the scan immediately with no confirmation. |
Note
Cancel and Re-run are single-click, irreversible actions — no confirmation dialog is shown.
⋮ menu (additional actions):
| Action | Description |
|---|---|
| Audit & System Logs | Displays the audit and system logs for that scan. |
| Report | Opens the scan report in a panel. Can be exported as CSV or XLSX (Export). |
| Compliance Report | Only enabled for scans in Completed status. A law/standard is selected in the panel, and the compliance report is downloaded as XLSX. |
| Version History | Opens the full version history of the target the scan belongs to. |
Other than Compliance Report and Report, all actions are available regardless of scan status. Actions other than Cancel and Re-run have no effect on the underlying data — they are for viewing and downloading only.
Scheduled Scans
Scans can be run automatically on a cron-based schedule. For example, 0 9 * * 1-5 starts the scan every weekday at 09:00. Scheduling is managed from the Data Sources > Scheduled File Targets tab, which allows individual file targets to be scheduled separately, each with its own scan calendar.
Scan Groups
Scan groups can be created to scan multiple servers in parallel.
QoS Profiles
The load a scan places on the target server can be limited using QoS (quality of service) profiles, preventing a large scan from slowing down the target system or other scans:
| Profile | Concurrent Jobs / Target | Files / Second | Retries |
|---|---|---|---|
| LOW | 1 | 5 | 5 |
| MEDIUM | 3 | 20 | 3 |
| HIGH | 5 | 50 | 2 |
Runtime Limits
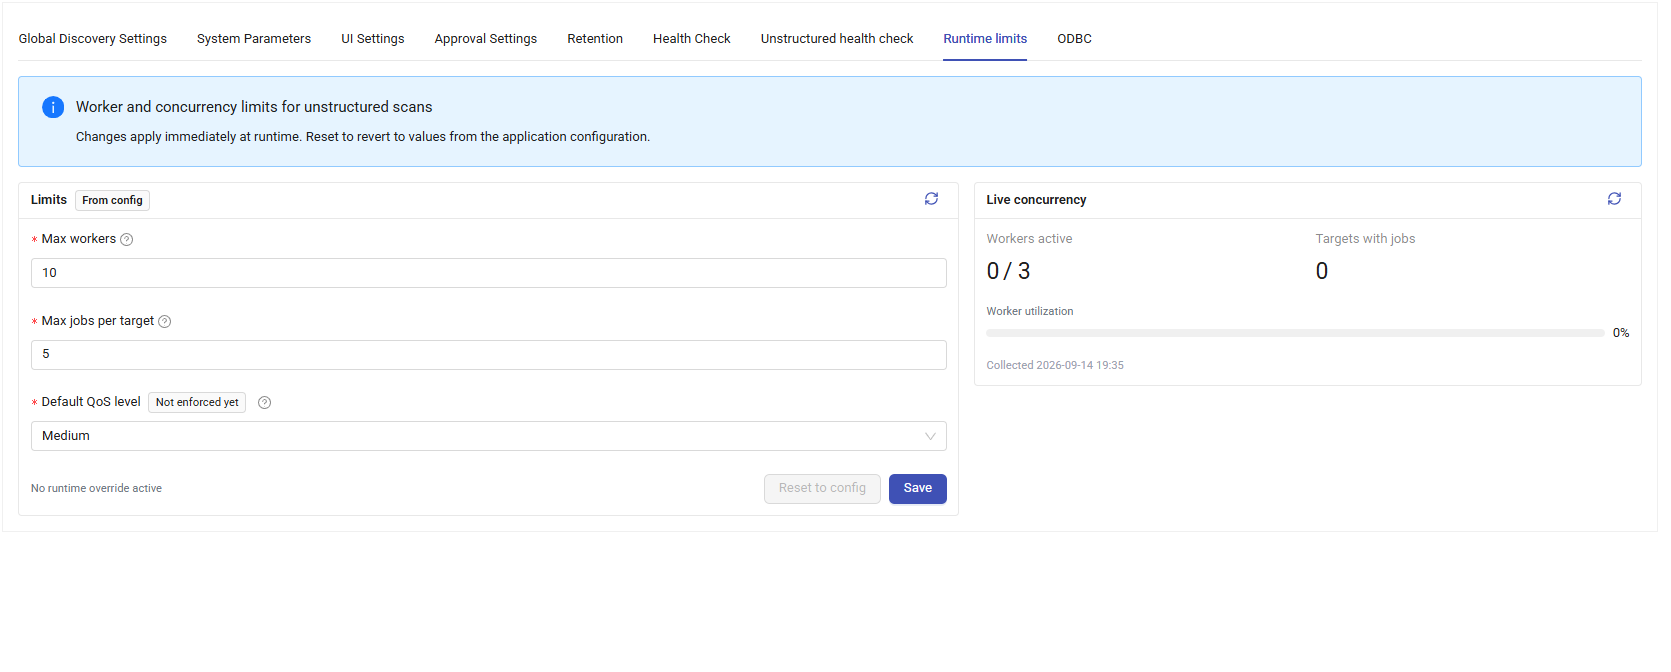
The Runtime Limits screen allows the worker and concurrency limits — and the default QoS level — used by unstructured discovery jobs to be managed at runtime. It is also reachable from Settings > Runtime limits.
Changes made on this screen take effect immediately after clicking Save, with no application restart required. Reset to Config removes any runtime overrides and reverts to the values defined in the application configuration; the From config tag shows the values currently in effect are the configuration defaults. When no override is active, the screen shows "No runtime override active."
Limits panel:
| Parameter | Description |
|---|---|
| Max Workers | The maximum number of workers that can run system-wide at the same time. |
| Max Jobs per Target | The maximum number of scan jobs that can run against a single target at the same time. |
| Default QoS Level | The default QoS level (Low, Medium, or High) used when a scan is created without specifying one. This is the same QoS level used by the QoS Profiles described above. |
Live Concurrency: the panel on the right side of the screen shows the system's current runtime status, with a Collected timestamp for when the data was last refreshed:
| Indicator | Description |
|---|---|
| Workers Active | The number of workers currently active, and the configured maximum. |
| Targets with Jobs | The number of targets that currently have an active scan job. |
| Worker Utilization | Worker resource utilization, shown as a percentage. |
Re-Run
Re-Run restarts a scan using its existing settings. The Re-run button appears in the Actions column for every status except Running (Completed, Failed, Pending, Cancelled, Stopped); clicking it restarts the scan immediately with no confirmation. Thanks to change detection (delta), only new or changed files are processed on repeated scans, significantly reducing scan duration.
Scan Result Screens
Once a scan completes, the following detail screens are available for it.
Monitor
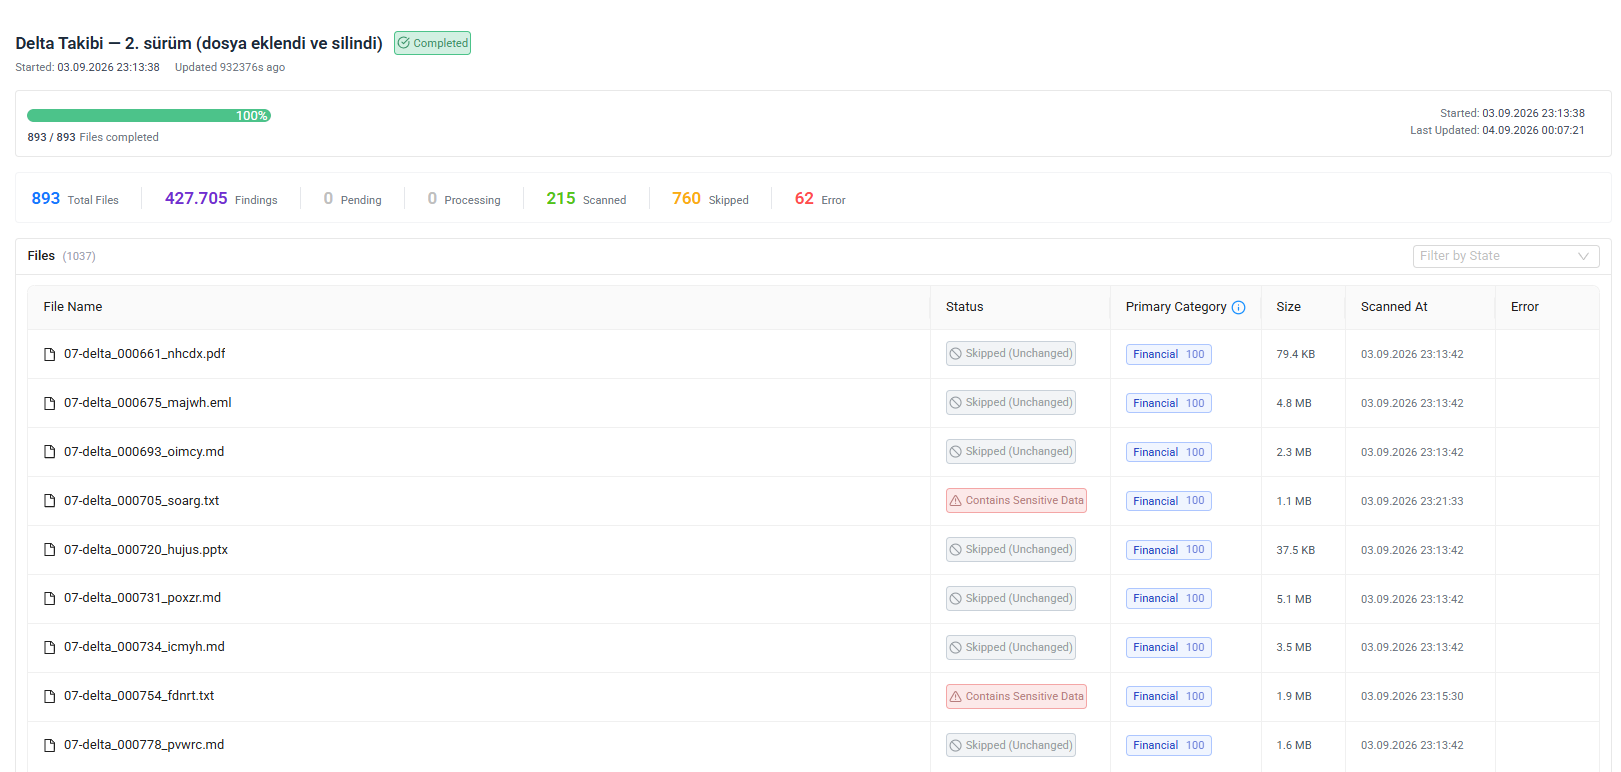
The Monitor screen shows the scan's live status: a progress bar with the completion percentage and file count, start/last-updated times, and a breakdown of files by state — Total Files, Findings, Pending, Processing, Scanned, Skipped, and Error. Below this, a Files table lists each processed file's name, status, primary category, size, scan time, and any error.
Findings
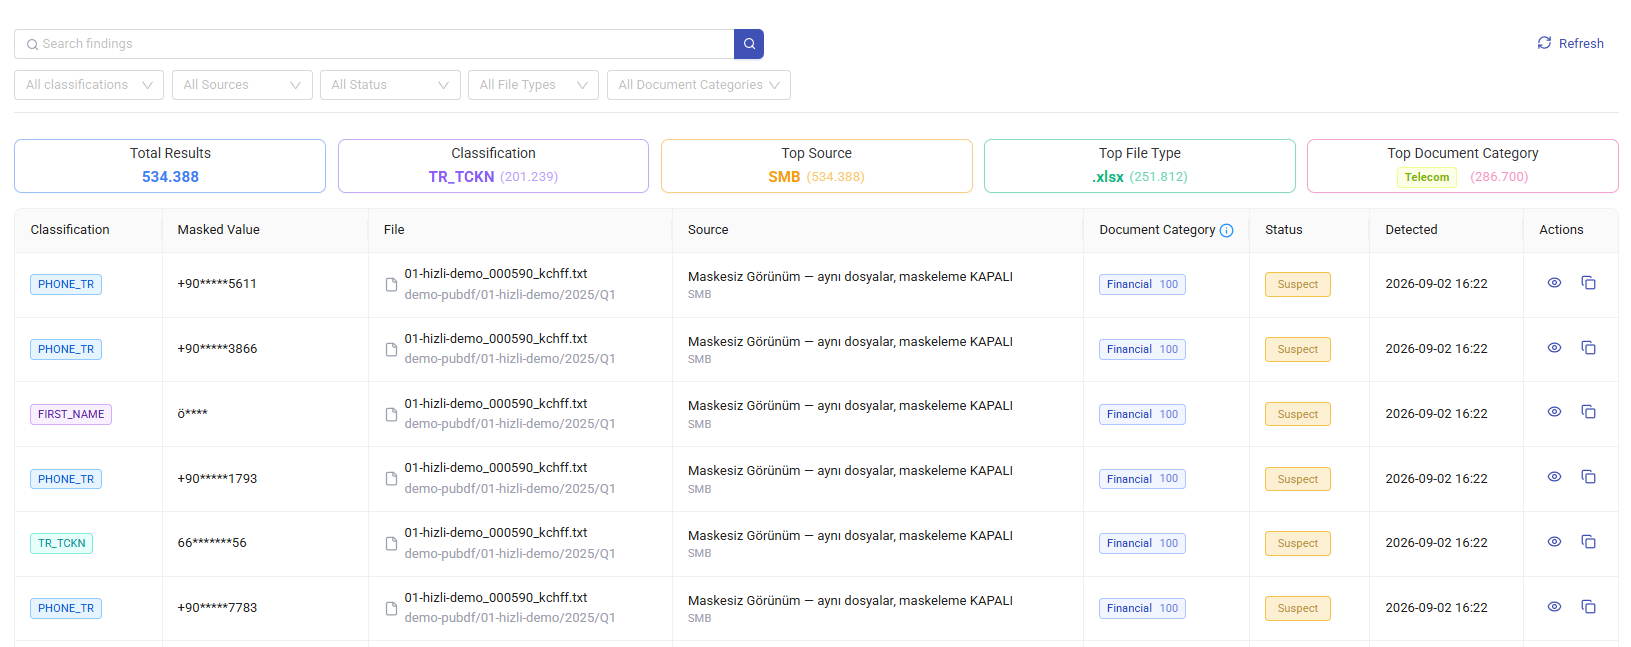
The Findings screen lists all findings for a scan. Findings can be reviewed, exported, and sent into the review workflow from here.
At the top of the screen, findings can be exported as CSV or XLSX. If rows are selected in the table, only the selected rows are exported; otherwise, all findings for the scan are downloaded.
The top of the page shows the total finding count and a breakdown by risk status:
- Findings: Total number of findings
- Sensitive / Suspect / Safe: Finding counts by risk class
- Files with Findings: Number of files containing findings
- Skipped Files: Number of skipped files (shown if applicable)
- If review has taken place, Confirmed, False Positive, Override, and Ignored counters are also shown
Aggregate analysis panels: above the finding list are collapsible panels, expanded by default:
- Risk Distribution: finding distribution by confidentiality level (Strict Confidential, Confidential, Internal, Public, Unclassified)
- Classification: finding count and percentage by PII type
- Top Files by Findings / Top Files by Risk Score: files with the most findings or the highest risk score. The Top Files by Risk Score panel lists, per file, the finding count, Max Risk and Avg Risk scores (shown as colored badges), and the classifications detected in that file.
- Skipped Files: skipped files and the reasons they were skipped

Findings can be filtered by:
- Classification: by classification type (searchable dropdown)
- Process Status: by Sensitive, Suspect, or Safe status
- Document Category: by document category (shown if applicable)
- File Path: text search on the file path
The findings table includes:
- Masked Value: the masked finding value. Findings carried over from a prior scan show a "From prior scan" tag.
- File Name: the name of the file.
- Classification: the classification type. If overridden, it is shown with an orange Override tag.
- Document Category: the document category.
- Process Status: the finding's review status (Suspect / Sensitive / Safe).
- Source: the detection source (Text, OCR, or PDF OCR). For OCR-sourced findings, the confidence percentage is shown in color, with a reliability warning for values below 50%.
- Detected At: the detection date.
The ⋮ menu at the end of each row provides:
- View File: opens the file viewer (see Viewer).
- Show Similar Files: lists exact copies and similar documents for the selected file (see Similarity Discovery).
When masking is enabled, findings are shown in masked form; raw sensitive data is never displayed in clear text.
Document Category
In addition to findings, the Findings screen can also display each file's document category. The system can automatically determine which business area a file belongs to. Classification is performed across 15 business categories — Financial, Human Resources (HR), Legal, Medical, Intellectual Property, Marketing, Administrative, Personal, Banking, Insurance, Telecom, E-commerce, Tax Compliance, Government, and Education — plus an Unknown fallback category for files that don't clearly match any of them.
The following signals are evaluated together when categorizing a file:
- File name
- Folder path
- File type
- Keywords and specific patterns found in the content
- Types of sensitive data detected
The system combines all of these signals to produce a score for each category and reports the category with the highest score as the file's document category. For example, if terms such as salary, payroll, or performance review appear in a file, the system is likely to classify it under the HR category. Similarly, documents containing contracts, confidentiality clauses, or legal language may be classified under Legal.
This allows users to see not only where sensitive data is located, but also which business category a document belongs to.
File Category Scoring
Scanned files are associated with one or more categories based on their content. For each category, the system calculates a confidence score (Score) between 0 and 100, based on multiple evaluated characteristics of the file.
Evaluated criteria:
| Criterion | Description |
|---|---|
| File Path | The file's folder structure, file name, and extension are evaluated. |
| File Type (MIME Type) | Whether the file format is compatible with the category is checked. |
| Keywords | The file content is searched for words and phrases specific to the category. |
| Patterns | Specific text structures and regular expressions specific to the category are detected. |
| PII Compliance | Whether the detected sensitive data types support the relevant category is evaluated. |
Multiple category support: a file is not limited to a single category — the same file can receive different scores for multiple categories. Only the top 3 scoring categories are shown per file, and categories scoring below 45 are not displayed. For example, a file scoring Legal 80, Financial 12, and HR 6 would show only Legal 80 — the Financial and HR scores fall below the display threshold.
What the scores mean:
| Score | Description |
|---|---|
| 90–100 | Very strong match. Multiple analysis criteria strongly support the same category. |
| 70–89 | Strong match. The file is highly likely to belong to the category. |
| 50–69 | Moderate match. The file shows some characteristics of the category. |
| 0–49 | Weak match. The detected signals do not provide enough confidence for the category. |
Finding Search
Reached via Unstructured Data > Finding Search in the sidebar, this screen allows searching findings from scans run with masking disabled (unmasked). It runs on OpenSearch and supports full-text search by finding value.
Viewer
The file viewer (Viewer) is opened from a finding row's menu (⋮ → View File) on the Findings screen. PDF, image, text, and HTML/Office files can be previewed directly.
The right-hand panel of the viewer lists all PII findings detected in the file. Each finding can be revealed or hidden individually (reveal/hide); every server-side "reveal" action is recorded in the audit log.
- Reveal All / Hide All toggles all finding masks at once.
- PII-type filter chips can be used to show only certain finding types.
- Download Masked: downloads a copy with detected PII masked — a redacted PDF for PDF files, and a redacted PDF or HTML copy for Office files.
- Download: downloads the original file as-is.
If a file has been deleted, exceeds the size limit, has an unsupported format, or cannot be redacted (for example, PII location cannot be determined by OCR in an image), an informational message is shown instead.
Scan Report
Scan Report is a summary report of the scan result. It is opened from a panel accessed via the ⋮ menu on the scan list; the panel offers a CSV or XLSX format choice and an Export button to download it. The Export button is disabled until the report data has loaded. The report includes:
- Classifications found
- Risk scores
- File distributions
- Scan statistics
Compliance Report
Compliance Report evaluates scan results against regulations such as KVKK and GDPR. It is only available for scans in Completed status; the button is disabled for all other statuses. In the panel that opens, a law or standard is selected (currently only PCI DSS is selectable); once selected, the classifications tied to that standard are listed. The Generate Report button is disabled until a standard is selected; clicking it downloads the compliance report as XLSX. The report can be reviewed by findings and affected files within the scope of the regulation.
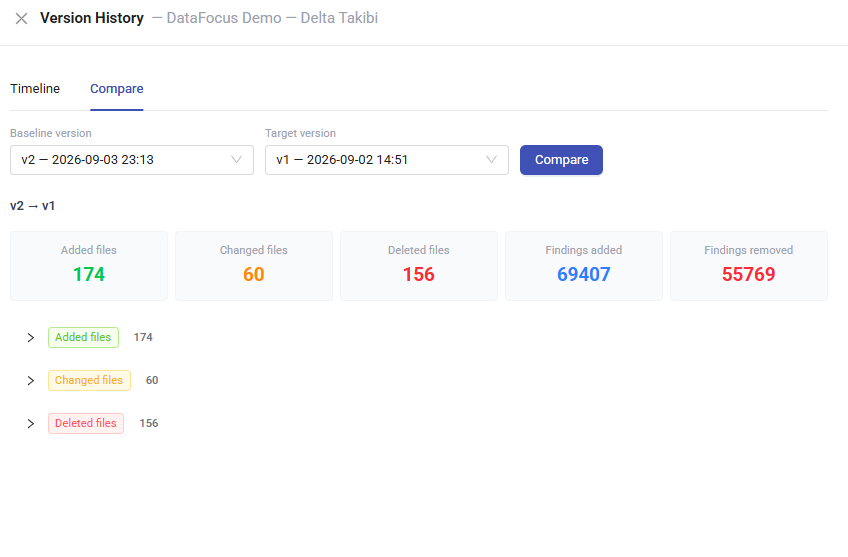
Version History
The Version History screen shows the full version history of the target a scan belongs to, across two tabs:
- Timeline: lists the target's past scans version by version; each row shows status, start/end time, added/changed/deleted/unchanged file counts, and added/removed finding counts.
- Compare: compares two selected versions. A Baseline version (optional) and a Target version (required) are selected, then Compare is clicked. For the first scan, an informational message is shown since there is no prior version to compare against.
Comparison results can show:
- Newly added files
- Deleted files
- Changed files
- Unchanged files
Scan Detail Page
The scan detail page summarizes a scan's file list, folder statistics, errors, DLQ records, file type distribution, and metadata write operations on a single screen. It is reached by clicking a scan's name in the Discoveries list, or by clicking the related scan from a finding on the Findings screen.
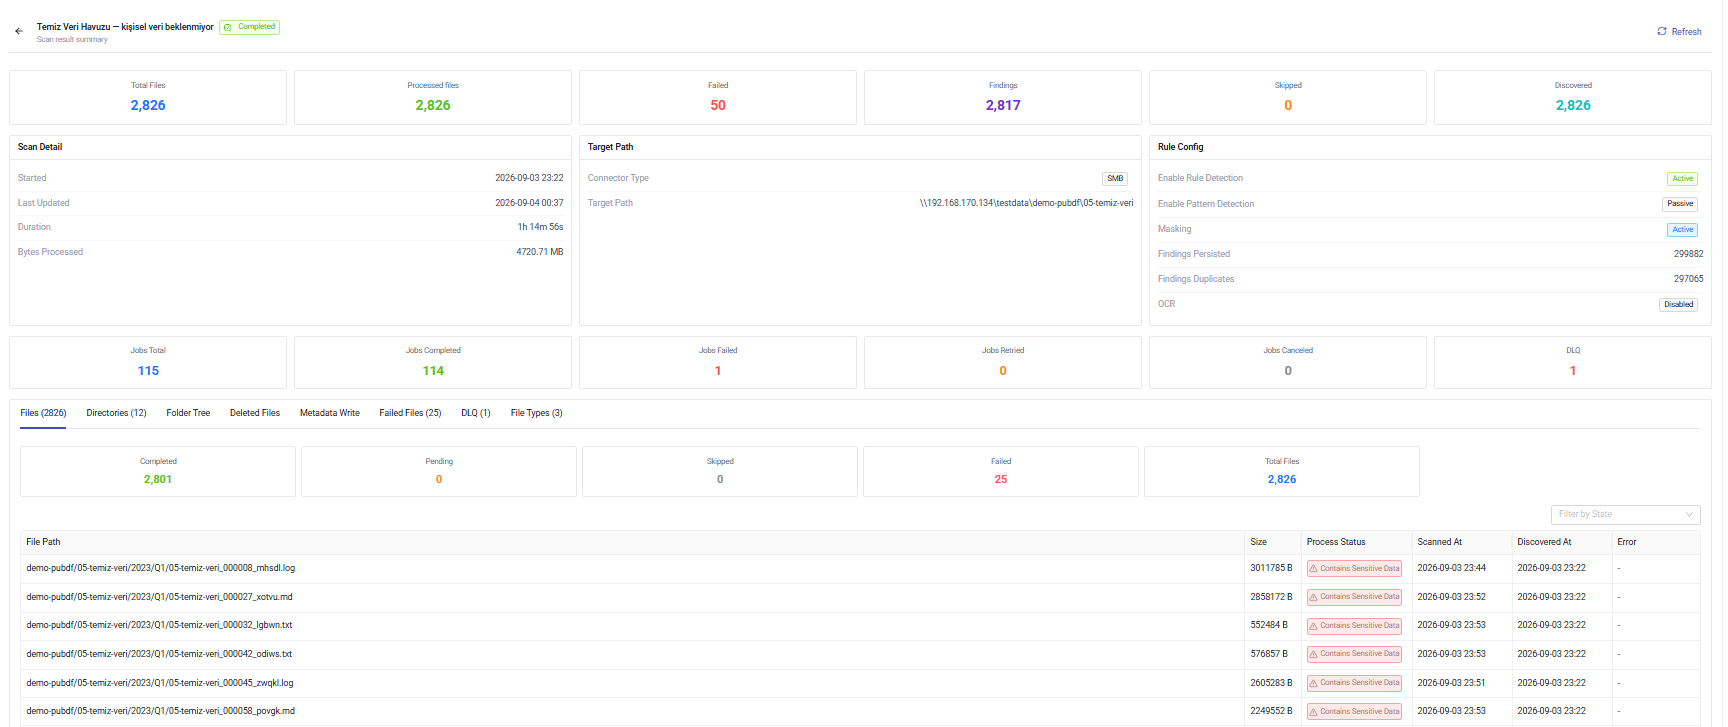
Header area: shows the scan name, current status tag, and Back / Refresh buttons. Refresh reloads the summary data on the page. If the scan is in Failed status, a red warning box with the error code and error detail is shown.
Note
This page does not provide actions to start, stop, cancel, or export findings from a scan. These actions are performed from the Discoveries screen (start/stop) and the Findings screen (export), respectively.
Summary and info cards: the top of the page shows six summary statistic cards — Total Files, Processed Files, Failed, Findings, Skipped, and Discovered. Below them, info cards show:
- Scan Detail: start time, last update time, duration, and processed data size (if available).
- Target Path: connector type and the full address of the scanned target path.
- Rule Config: whether rule/pattern detection is enabled, number of defined rules, masking tag, saved/duplicate finding counts, and OCR settings.
- Jobs: total, completed, failed, retried, and canceled job counts (if applicable), plus the DLQ count.
Tabs: the bottom of the page has eight tabs:
| Tab | Content |
|---|---|
| Files | List of all scanned files (File Path, Size, Process Status, Scanned At, Discovered At, Error). Status-based counters are shown at the top; the Filter by State menu filters files by status (e.g. clean, skipped, error). |
| Directories | Folder-level summary: file path, total file count, and finding count. |
| Folder Tree | A hierarchical tree view of the folder structure. Each node shows a file count and status tags (PII, Clean, Skipped, Error, Deleted, Pending, Findings); hovering over the Classifications tag shows the distribution by classification type. |
| Deleted Files | List of files detected as deleted from the source during this scan (File Path, Size, Deleted At). |
| Metadata Write | Manages writing classification metadata to files (detailed below). |
| Failed Files | List of files that failed to process (File Path, Error, Size, Discovered At). Retry All Failed re-queues all failed files after confirmation. |
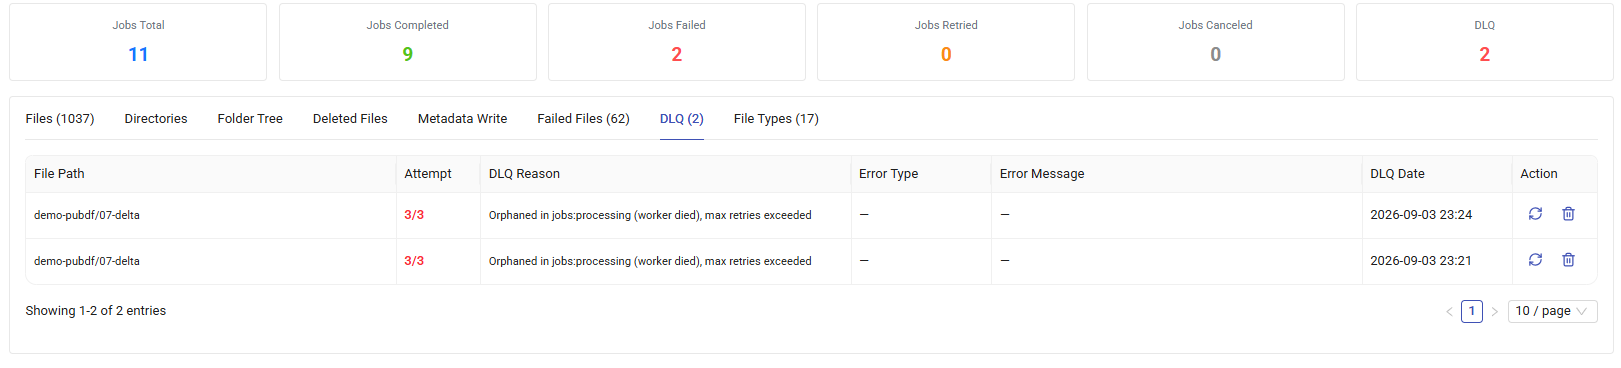
| DLQ | List of jobs that could not be processed permanently: retry count, DLQ reason, error type, and error message. Retry and Delete (after confirmation) are available per row. |
| File Types | A pie chart showing distribution by category (Distribution by Category) and a bar chart showing file count by extension in descending order (File Count by Extension). |
General behavior:
- Tabs can be viewed while a scan is still running/pending; a tab appears empty if its data has not been generated yet.
- Each table manages its own loading state; file lists use server-side pagination.
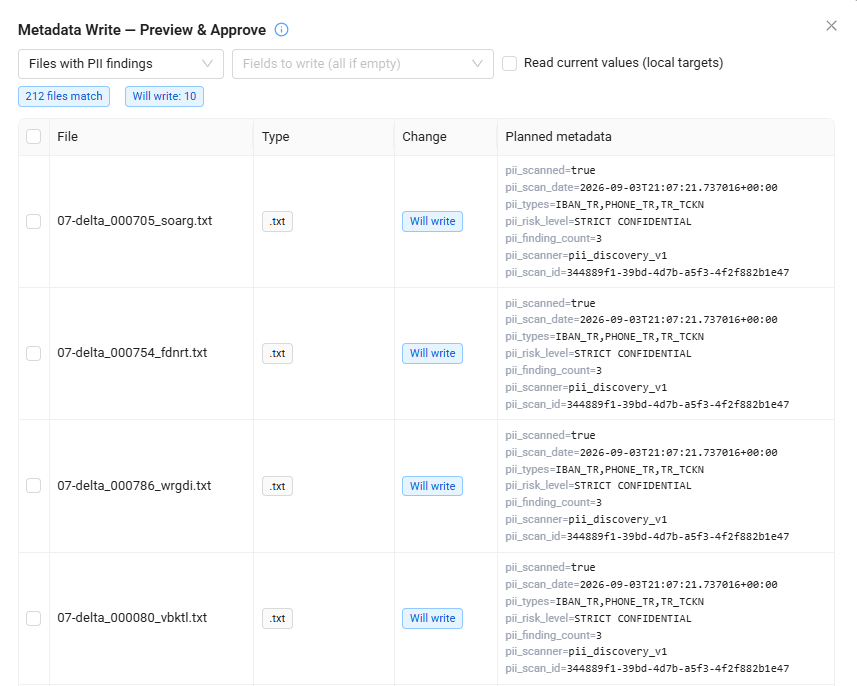
Metadata Write: the Preview & Write Metadata button on the Metadata Write tab opens a Metadata Write — Preview & Approve window previewing the classification metadata that will be written to files. Nothing is written until confirmed; only classification information is written to files — raw sensitive data is never written.
- Policy: selects the write scope — Files with PII findings (default), High-risk files only, or All scanned files.
- Fields to write: the metadata fields to write can be selected; if left empty, all fields are written.
- Read current values can be enabled (for local targets) to read back the metadata already present on each file before writing.
- The preview table shows, per file, its type, a Change status (e.g. Will write / No change), and the Planned metadata that will be written — fields such as
pii_scanned,pii_scan_date,pii_types,pii_risk_level,pii_finding_count,pii_scanner, andpii_scan_id. Selecting rows limits the write to only the selected files, otherwise all matching files are written. - The Write Metadata button starts the operation. Results from previous write operations (Written, Failed, Skipped, Unsupported, Total Files) and any error table are shown on the tab.
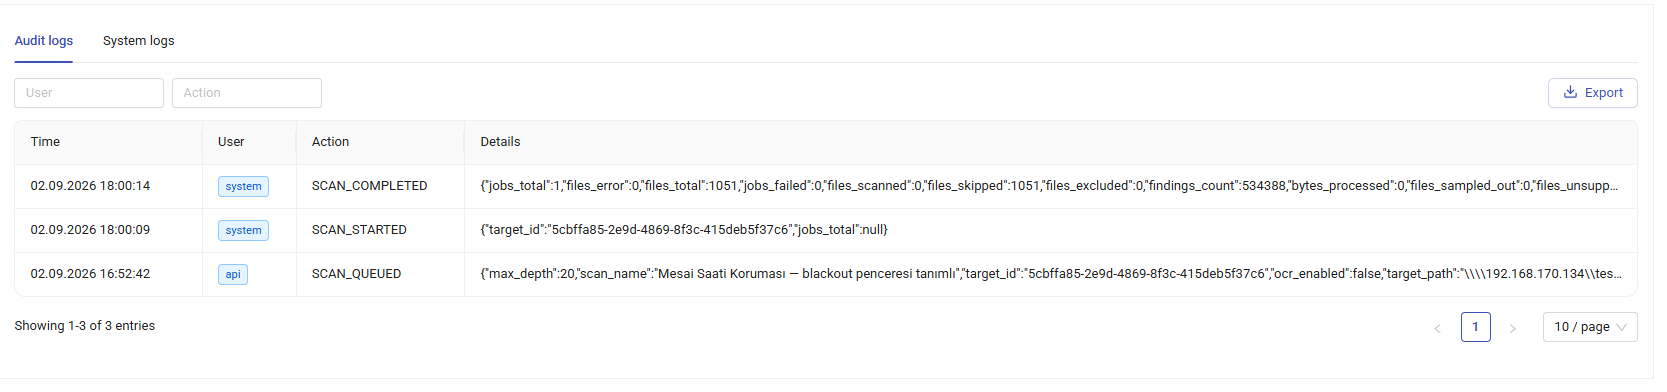
Audit & System Logs
All operations and system logs that occur during a scan can be viewed from this screen, across two tabs, Audit logs and System logs. Entries can be filtered by User and Action, and the list can be downloaded with the Export button. Each audit log entry shows the Time, User, Action (e.g. SCAN_QUEUED, SCAN_STARTED, SCAN_COMPLETED), and a Details field with the related event data in JSON format. Audit records provide traceability of user actions.
Analytics
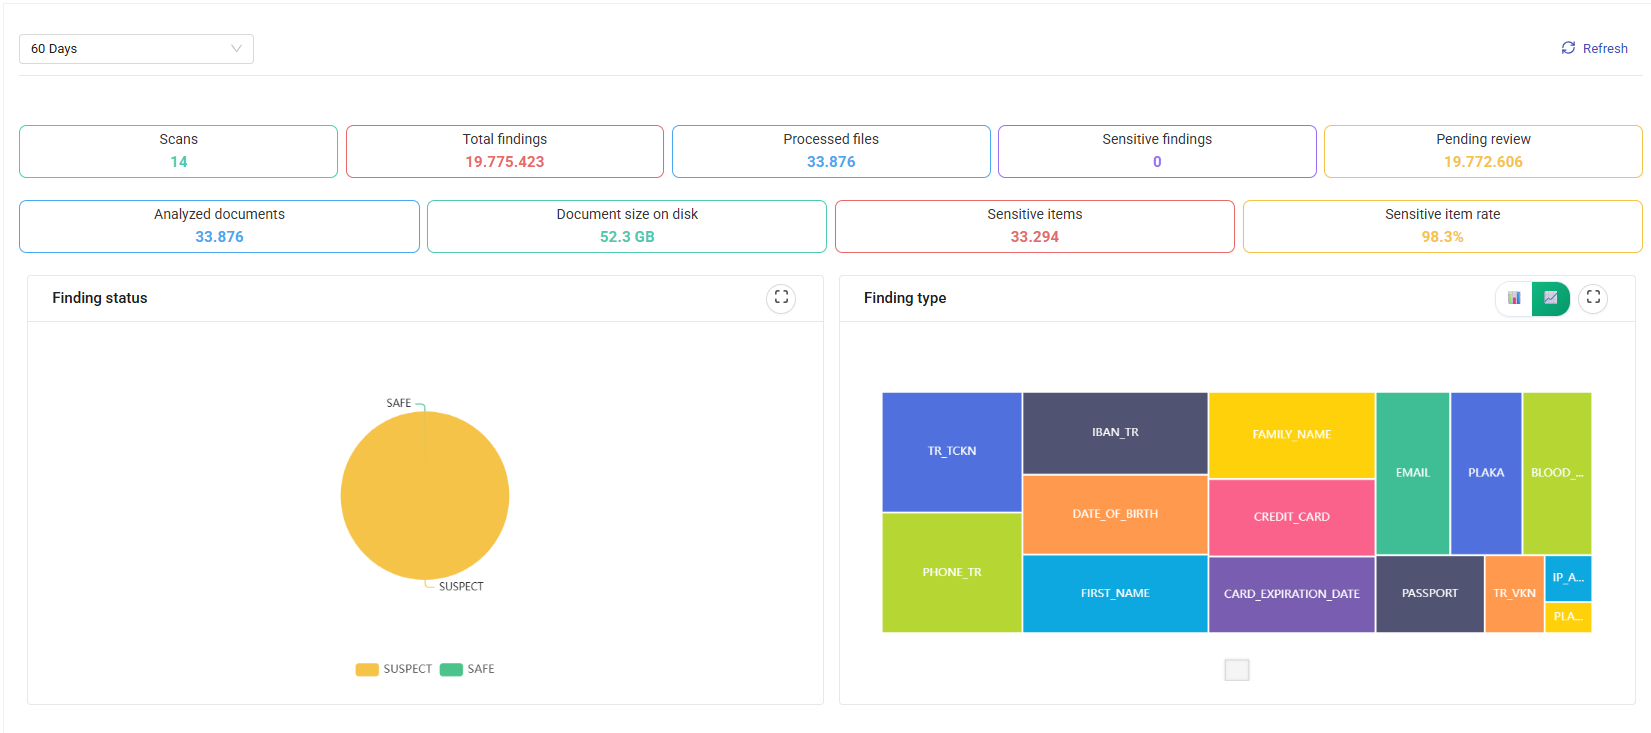
Reached via Unstructured Data > Analytics in the sidebar, the Analytics screen is an analysis dashboard showing overall statistics across all scans, for a selectable time range (e.g. 60 Days). Summary cards show Scans, Total findings, Processed files, Sensitive findings, Pending review, Analyzed documents, Document size on disk, Sensitive items, and Sensitive item rate. Below them, a Finding status chart breaks results down by status (Suspect/Sensitive/Safe), and a Finding type chart shows the distribution of findings by classification (e.g. TCKN, IBAN, credit card, e-mail).
Risk Scoring and Masking
Risk Scoring
A finding's risk score is calculated on a scale of 0–100 by multiplying the risk label weight assigned to its classification by the detection confidence; if the classification has no risk label assigned, a default weight of 75 is used. Score ranges and risk levels are as follows:
| Score Range | Risk Level |
|---|---|
| 0–39 | Low |
| 40–69 | Medium |
| 70–89 | High |
| 90–100 | Critical |
Masking
For scans run with masking enabled, findings are stored in masked form in the system. Masking examples:
| Data Type | Raw Value | Masked |
|---|---|---|
| TCKN | 10012345678 | 10*78 |
| Credit Card | 4532123456781234 | ****1234 |
| IBAN | TR330006100519786457841326 | TR****1326 |
| ahmet.yilmaz@firma.com | a****.y****@firma.com | |
| Phone | +905321234567 | +90*****4567 |
Finding Review Workflow
Detected findings can go through a review workflow to be validated. Every finding is in one of the following statuses:
| Status | Description |
|---|---|
| SUSPECT | Not yet reviewed (default status) |
| SENSITIVE | Confirmed, requires action |
| SAFE | Confirmed as safe |
Users can apply the following actions to findings individually or in bulk:
| Action | Result | Description |
|---|---|---|
| CONFIRM | SENSITIVE | Confirm the finding as sensitive data |
| FALSE_POSITIVE | SAFE | Mark as a false positive |
| OVERRIDE | SENSITIVE | Confirm with a different classification type |
| IGNORE | SAFE | Ignore the finding |
Review steps: on the Findings screen, after selecting one or more finding rows, a result is chosen from the Process menu at the top (Confirm, Override, False Positive, or Ignore). The selection automatically opens the process window.
In the window that opens, the Conclusion field is pre-filled with the selected value. If Override was selected, a new classification type (Override Classification) must also be specified. A note can optionally be added. Clicking Save saves the record; on success, the selection is cleared and the table and summary cards refresh automatically.
Findings marked as false positive are saved by the system. Once review is complete, confirmed findings can be published to the catalog.
False Positives
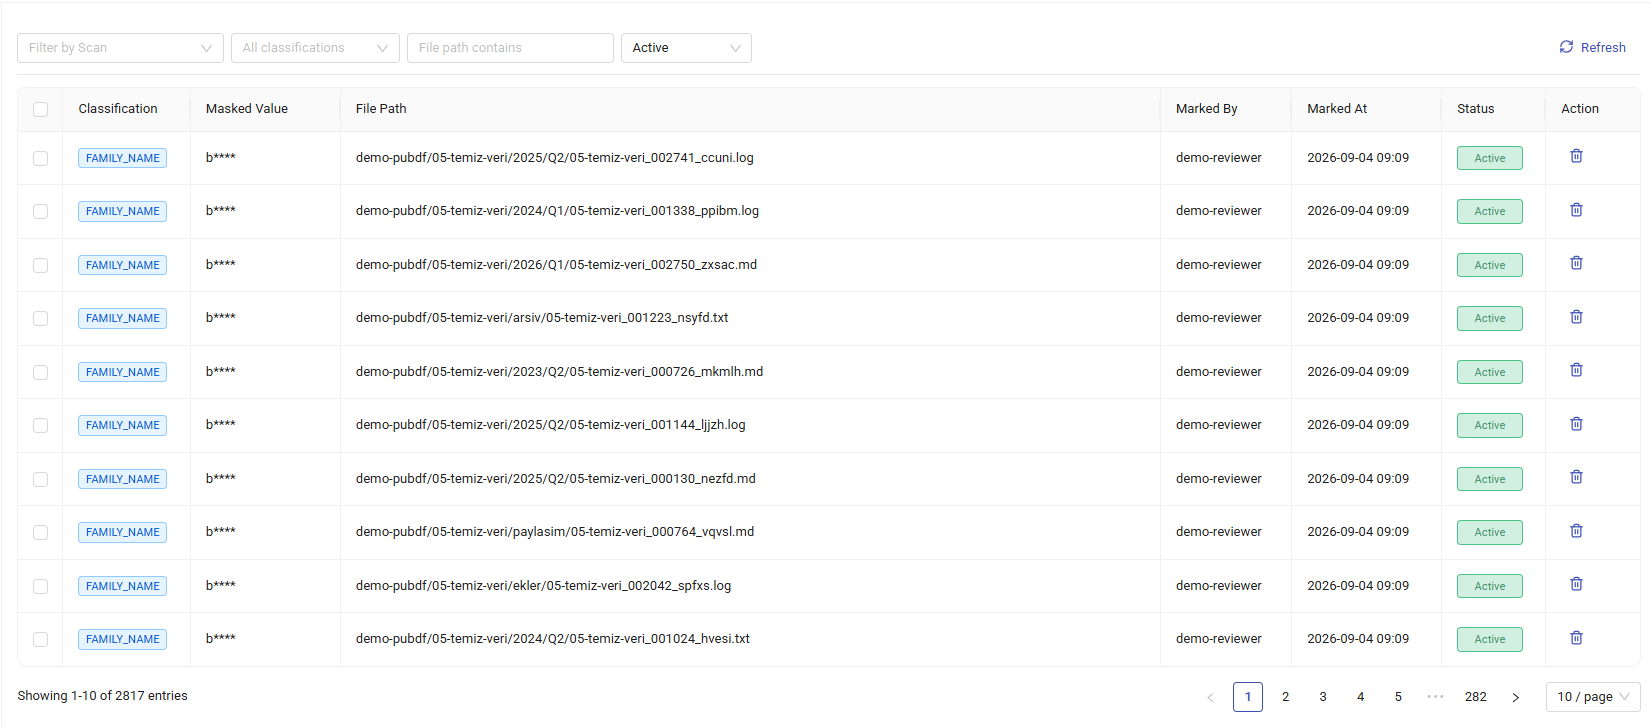
Records marked as false positive during review are managed centrally on the False Positives screen, reached via Unstructured Data > False Positives in the sidebar. Removing a record here allows the related finding to be re-evaluated in future scans.
Similarity Discovery
Similarity Discovery detects documents that are identical or similar to one another based on content. This analysis does not rely on file name or metadata alone — the actual content of the document is analyzed. Exact copies are detected through content-hash comparison and always run. Similar (near-duplicate) documents are detected through content-fingerprinting techniques, which are disabled by default and must be enabled during installation with SIMILARITY_ENABLED=true; once enabled, the default similarity threshold is 85%, and comparison is independent of file format.
For example, similarity ratios can be calculated by comparing:
- A PDF file and a Word file
- Two separate documents on different servers
- The same content saved under different names
For example, if a file named sozlesme_v2.pdf on one server is largely identical in content to sozlesme_final.docx on another server, the system may report the two files as 85% similar.
This feature makes it possible to:
- Detect duplicate documents
- Reduce data redundancy
- Find sensitive-data copies
- Support data cleanup and data minimization efforts
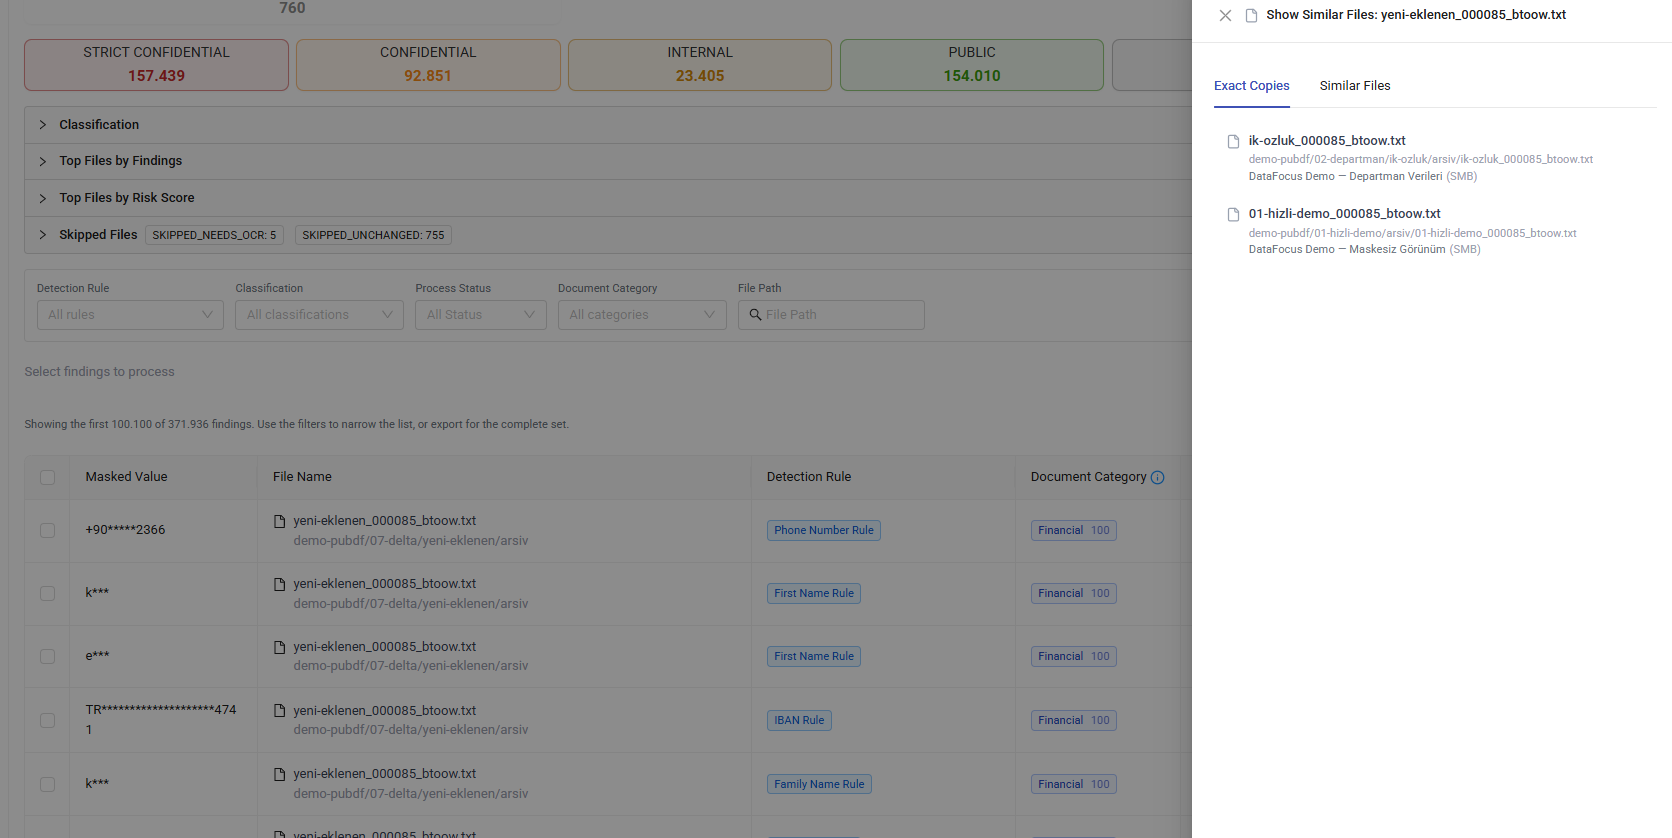
Viewing similar files from Findings: from any finding row's menu on the Findings screen (⋮ → Show Similar Files), the similar files for the selected file can be viewed directly. The panel that opens has two tabs:
- Exact Copies: lists files with identical content. Clicking a row searches for that file on the Finding Search screen.
- Similar Files: a similarity threshold slider (70%–100%, default 85%) can be adjusted; results are shown with their similarity percentage.
If fingerprinting is not enabled, or the file has not yet been fingerprinted, an informational message is shown; Exact Copies results are unaffected and always shown.
Masked Copy
The system can generate masked copies of unstructured files. A new file is produced without altering the original, with detected sensitive data masked on the new copy.
For example, a Turkish ID Number, IBAN, credit card number, or other sensitive information found in a PDF document can be masked to produce a new file.
This allows:
- The original document to be preserved
- Users to work on a safe copy
- Sensitive data to be kept from spreading during testing, sharing, and review
Write Metadata
The Write Metadata feature writes detected classifications into a file's metadata (document properties). Office (DOCX, XLSX, PPTX) and PDF formats are supported. Tags are written to the Info dictionary for PDF files, to custom document properties for Office documents, and to extended attributes (xattr) for file systems. Only the classification tag is written to the file — raw sensitive data is never written.
These tags allow other systems (e.g. DLP and access-control solutions) to read a file's sensitivity level directly from its metadata.
OWA E-mail Classification Add-in
The OWA Data Classification Add-in is an add-in that runs in the compose screen of Outlook on the web. E-mails are classified based on their content before being sent. The add-in is advisory — it does not block sending. The interface is shown in Turkish or English depending on the Office language.
How It Works
Content analysis runs synchronously; no e-mail content is stored in the system during analysis:
- The subject, body, and attachments of the e-mail are passed through the detection pipeline.
- Each finding is converted into a risk score between 0–100 and mapped to a classification level using weight-based thresholds — the same mechanism used by scan reporting.
- The analysis result shows the suggested level, a sensitive-data warning, and a masked finding list (type + source: subject/body/attachment).
- Raw sensitive data is never returned — only masked values are shown.
- Classification levels are defined by an administrator and shown in the dropdown with color badges.
- If there is no connection to Data Focus, the analysis service is temporarily unavailable.
User Workflow
- Create a new e-mail and open the add-in panel via Classification → Classify on the ribbon.
- Optionally click Analyze Content; the subject, body, and attachments are scanned, and the suggested level, sensitive-data warning, and masked findings are displayed.
- Select a level from the dropdown (the suggested level is selected automatically) and click Apply Selected Level. An
X-Classificationheader, a subject prefix, and an informational banner in the body are added to the e-mail. - When Send is clicked, if the e-mail has not been classified or is being sent at a level lower than suggested, a warning is shown; sending continues if confirmed.
Installation (Outlook)
The add-in is defined by a single manifest.xml file, served at the /owa/manifest.xml path of the customer's Data Focus instance. The task pane, commands, and icons — all resources — are loaded from this address at runtime; no files are copied to the user's computer.
Per-user installation (Outlook on the web):
- Open Get Add-ins in Outlook on the web.
- Choose Add a custom add-in → Add from URL.
- Paste the manifest address, click Add, and approve the permissions.
- Create a new e-mail; the Classification → Classify button appears on the ribbon.
Tenant-wide installation (administrator):
Through Microsoft 365 Admin Center → Settings → Integrated apps → Upload custom app → Provide link to manifest file, the add-in can be deployed to the entire organization using the manifest address.
The add-in requires requirement set Mailbox 1.14; both Outlook on the web and new Outlook for Windows are supported.
DLQ and Failed Files
Two different mechanisms handle files that cannot be accessed or processed during a scan.
DLQ (Dead Letter Queue)
Transient errors — for example, a temporarily unreachable SMB share, a network connectivity issue, or a locked file — are retried automatically, up to 3 attempts, before the job is placed in the DLQ. A job lands in the DLQ once it hits a permanent error or exhausts its retry attempts. DLQ jobs are not reprocessed automatically; they can only be retried or deleted manually, using the Retry and Delete actions on the DLQ tab.
Failed Files
Corrupted files (for example, a truncated or malformed archive or PDF whose content cannot be parsed) are marked with an Error status and listed on the Failed Files tab; Retry All Failed re-queues them. Encrypted files, unsupported formats, and files exceeding the size limit (e.g. over 100 MB) are marked as Skipped instead, and are not included in Retry All Failed.
Security
Because the product works with sensitive data, it is designed with a security-first architecture. Key security features include:
- Masked storage: when Mask PII Values is enabled, raw sensitive data is never written to the database; findings are stored only as masked values.
- In-memory processing: file content is processed in memory without writing temporary files to disk.
- Read-only access: scanned files are never modified; a classification tag is written only when the optional Write Metadata feature is explicitly enabled.
- Encrypted credential vault: connection credentials for data sources are stored encrypted with AES-256-GCM and are only decrypted at runtime.
- Authentication: enterprise SSO (Keycloak) or API key authentication can be enabled; mTLS is supported for inter-service communication.
- Traceability: all user actions are written to the audit log; system logs are kept free of sensitive data.
Glossary
Key terms used in this guide are explained below:
| Term | Description |
|---|---|
| PII / Personal Data | Information that identifies a person (name, TCKN, IBAN, health data, etc.) |
| Agentless | Remote scanning without installing software on the target server |
| Connector | A module that connects to a data source (e.g. S3, SharePoint, Gmail) |
| OCR | Converting text in an image into machine-readable text |
| Delta Scan | Scanning only new or changed files |
| Masking | Obscuring sensitive information (e.g. TCKN: 10*78) |
| Similarity Detection | Quickly finding identical or "near-identical" documents among many files |
| QoS | A profile for balancing and prioritizing scan load |
| Blackout Time | A day/time range during which scanning does not run |
| DLQ | A queue holding jobs that are temporarily unprocessable |
| Fan-out | Splitting a scan into many parallel jobs for execution |